
Динамическое формирование
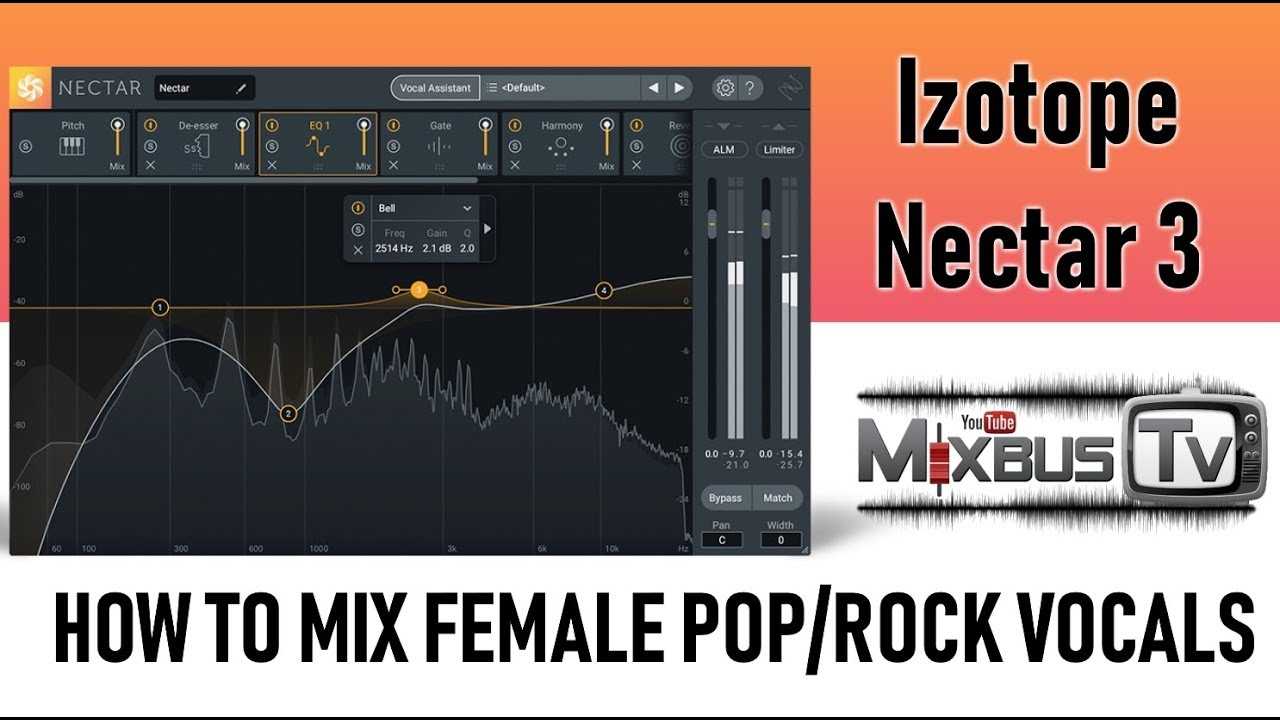
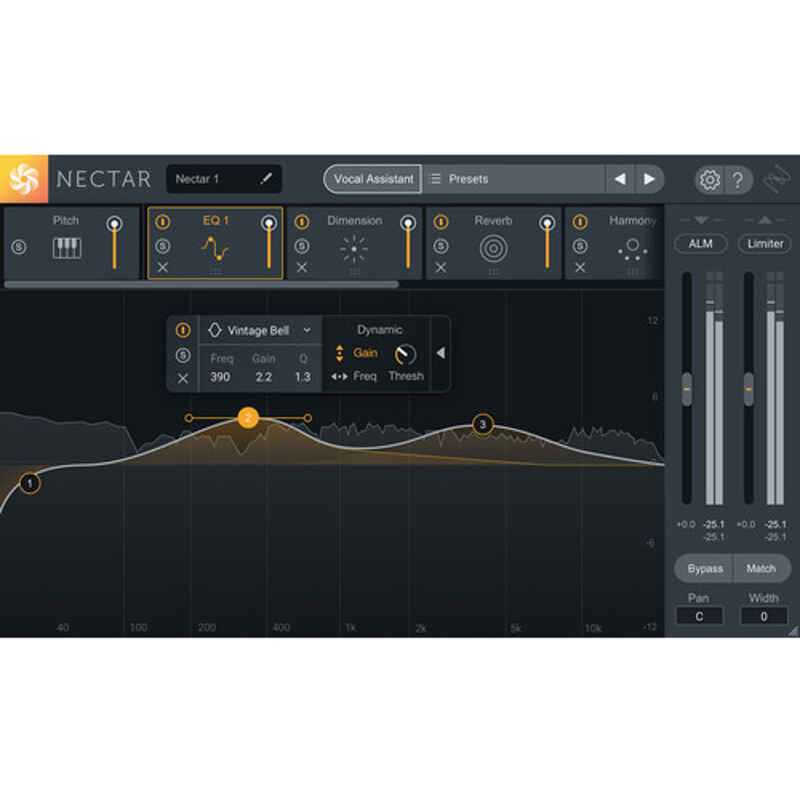
Одно из лучших нововведений – универсальный модуль эквалайзера, теперь с 24 полосами, 16 формами, соло полос и режимами динамического усиления и динамической частоты. Мы уже видели динамический эквалайзер как в Neutron, так и в Ozone, и он может быть очень полезен для прозрачного укрощения своенравных пиков, оставляя нетронутыми более тихие части. Тем не менее, частотный режим – это что-то новое, что позволяет вам создавать усиление или срезание и отслеживать высоту тона ближайшего движущегося пика гармоники.
Хотя он не предлагает более точных уровней управления, доступных в SurferEQ, отслеживающем высоту тона Sound Radix, это невероятно полезная функция, помогающая создать согласованный вокальный звук без необходимости автоматизации. Просто имейте в виду, что он оптимизирован для вокала и действительно не сработал, когда мы попробовали его на низком синтезаторном басе.
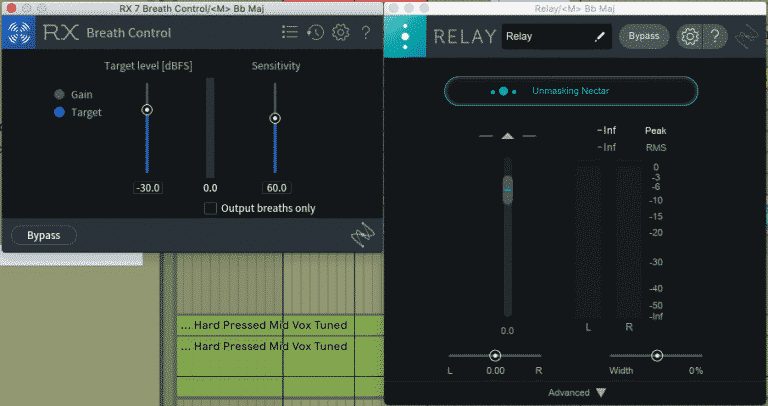
Еще одним дополнением является подключаемый модуль RX7 Breath Control, который по сути совпадает с модулем управления дыханием Nectar 2. Это позволяет вам установить величину уменьшения усиления или целевую громкость для звуков дыхания, что значительно сэкономит время.
Тем не менее, немного неудобно, что его нельзя вставить в полосу канала нектара. Это означает, что если вы поместите его перед нектаром, то вы подвергнетесь риску любого сжатия или обработки, изменяющей объем вдоха; или если вы разместите его позже, он не будет обрабатываться реверберацией или другими характерными эффектами.
На практике мы обнаружили, что наилучшие результаты были достигнуты, если поместить его перед Нектаром 3, а затем отрегулировать степень сокращения дыхания с учетом последующего сжатия.

Есть множество других полезных дополнений, включая два новых режима насыщенности для задержки; два новых режима для модуля Saturation; дополнительные голоса для модуля Harmony, всего до восьми; новый порог закрытия ворот; управление шириной стерео; и автоматическая компенсация громкости для кнопки байпаса. Также есть новый режим Auto Level, аналогичный Vocal Rider от Waves, который позволяет вам установить целевую громкость и использует выходной сигнал +/- 3 дБ, чтобы поддерживать его около этого уровня.
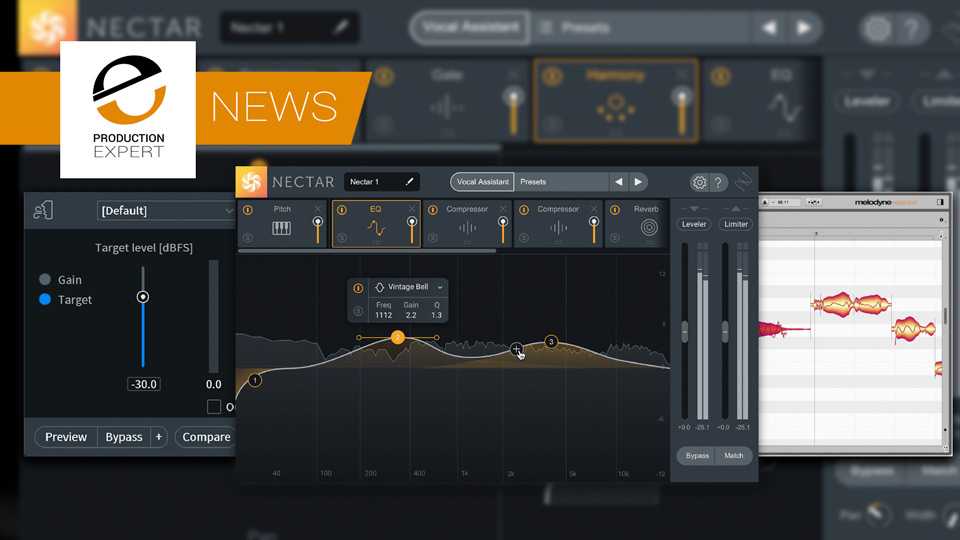
Последний кусок головоломки – редактирование высоты тона, и на этот раз iZotope отказалась от плагина Nectar 2 Pitch Editor в пользу сотрудничества с Celemony и предложения Melodyne Essential стоимостью 99 евро. Это хороший шаг, поскольку он означает, что iZotope может сосредоточиться на том, что у него получается лучше всего – на создании передовых технологий обработки, – и при этом легко предлагать высококачественные манипуляции с высотой тона от одной из лучших компаний в своем бизнесе.
Единственное, что я хотел бы отметить как недостаток, это то, что в Melodyne Essential отсутствуют более продвинутые и невероятно полезные инструменты редактирования высоты тона, которые позволяют настраивать дрейф высоты тона и вибрато исполнения. Однако, честно говоря, это по-прежнему чрезвычайно полезный и великолепно звучащий инструмент для более широких задач коррекции высоты тона, который поможет вам подняться по лестнице Melodyne с обновлением до Melodyne Assistant за 149 евро.
Dynamic EQs
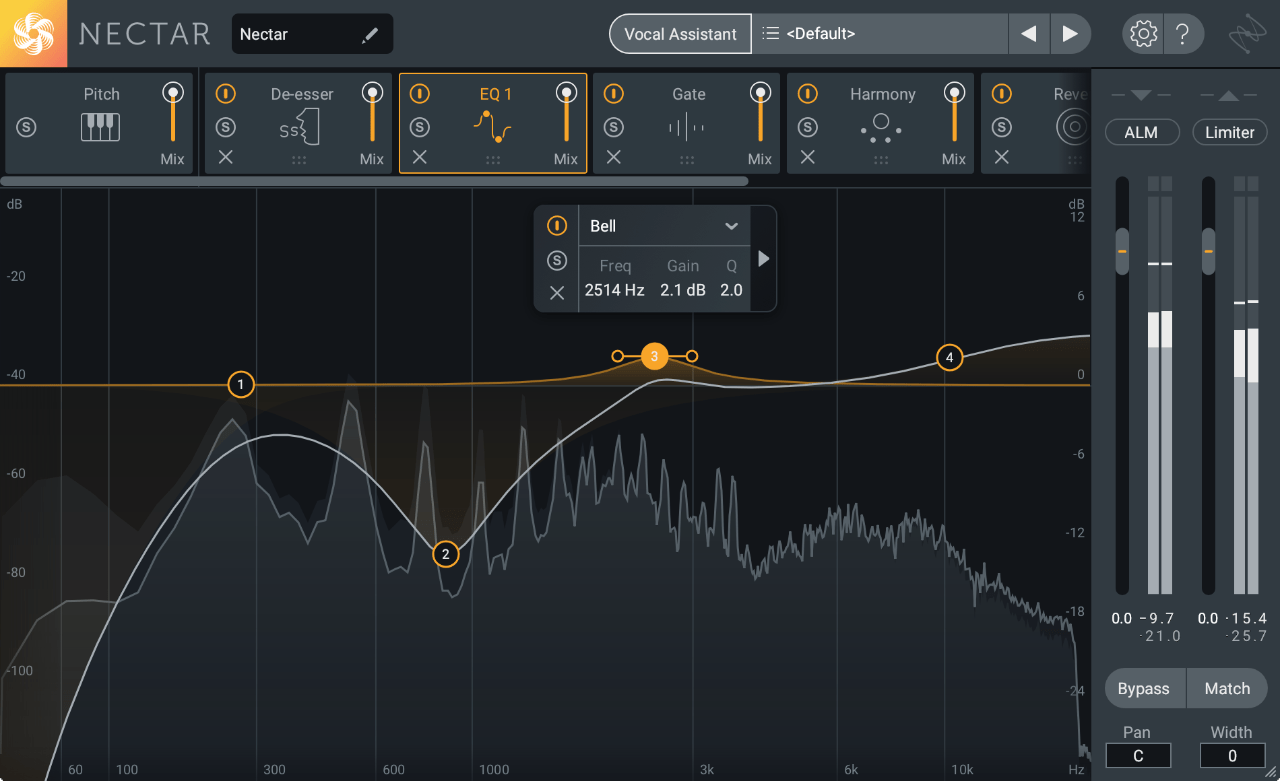
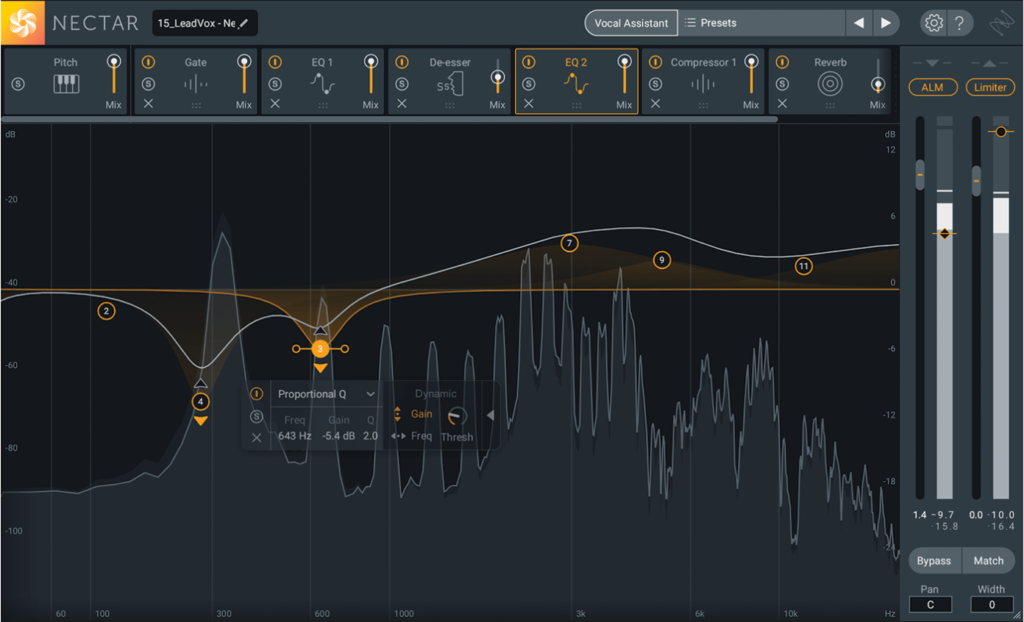
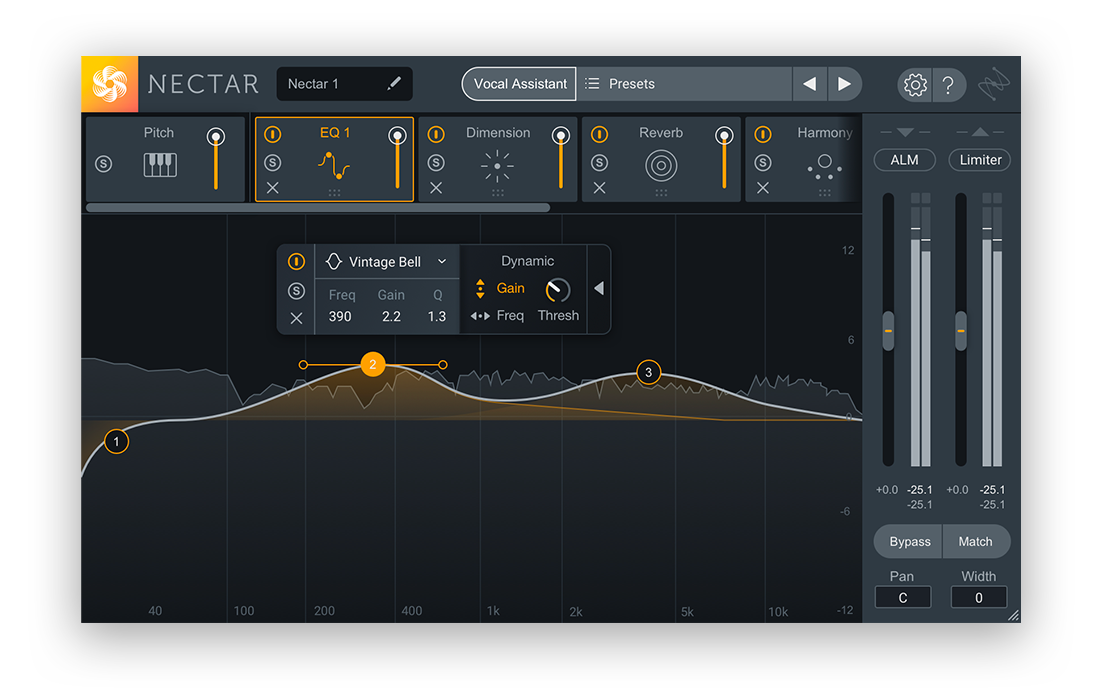 Something worth shouting out is Nectar 3’s addition of two brand-new dynamic frequency modes, which intelligently adjust their parameters to best match your vocals from moment to moment. Dynamic Frequency mode updates the frequency of a filter in response to harmonic frequency content changing over time, while Dynamic Gain mode automatically adjusts the level of a filter in response to the input. Simply click on a node (or add one of your own) and expand the Dynamic menu to turn these features on and off.
Pro Tip #1: Track the first harmonic of a vocal by enabling Dynamic Frequency Mode on a high pass filter. This will dynamically cut out undesirable low end rumble while preserving the vocal’s character.
Pro Tip #2: Turn Dynamic Frequency Mode on for a Bell filter to track and attenuate harsh vocal resonances.
Дополнительные материалы по iZotope Nectar 3:
Видео-инструкция по установке и активации
iZotope — Nectar 3.00.404
Название: iZotope — Nectar 3.00.404 VST, VST3, RTAS, AAX (x86/x64) RePack by VR ОС: Windows 7,8,10
Требования: Windows: XP (32-bit Service Pack 3), 7, 8, 10 Microsoft Visual C++ 2017 Redistributable Package, DAW или любая другая программа поддерживающая работу с VSTЯзык интерфейса: АнглийскийЛекарство: не требуется
И эта последняя версия действительно выводит весь процесс на новый уровень.
В последнее время iZotope активно расширяет набор программного обеспечения начиная от постпроцессинга и заканчивая стадией микширования.
Теперь iZotope предлагает плагины, которые могут ускорить каждый аспект вашего микса и улучшить его звучание, а Nectar 3 — последнее дополнение к их серии аудиопроцессоров. Nectar 3 специально предназначен для профессиональной обработки лишь одной области вашего микса — вокального трека.
Vocal Assistant
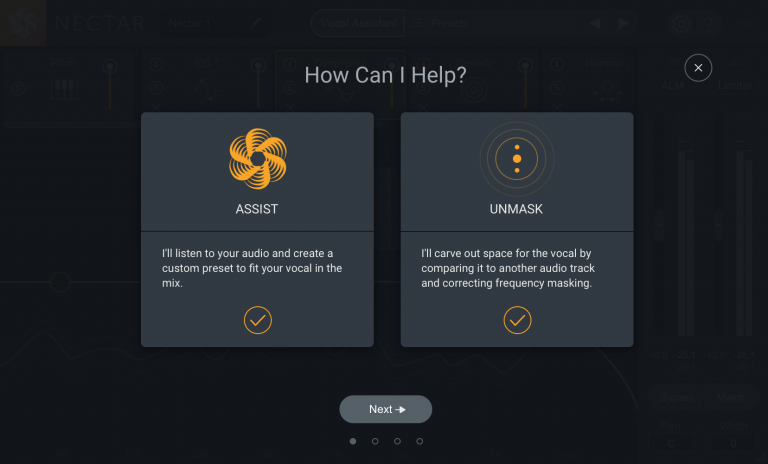
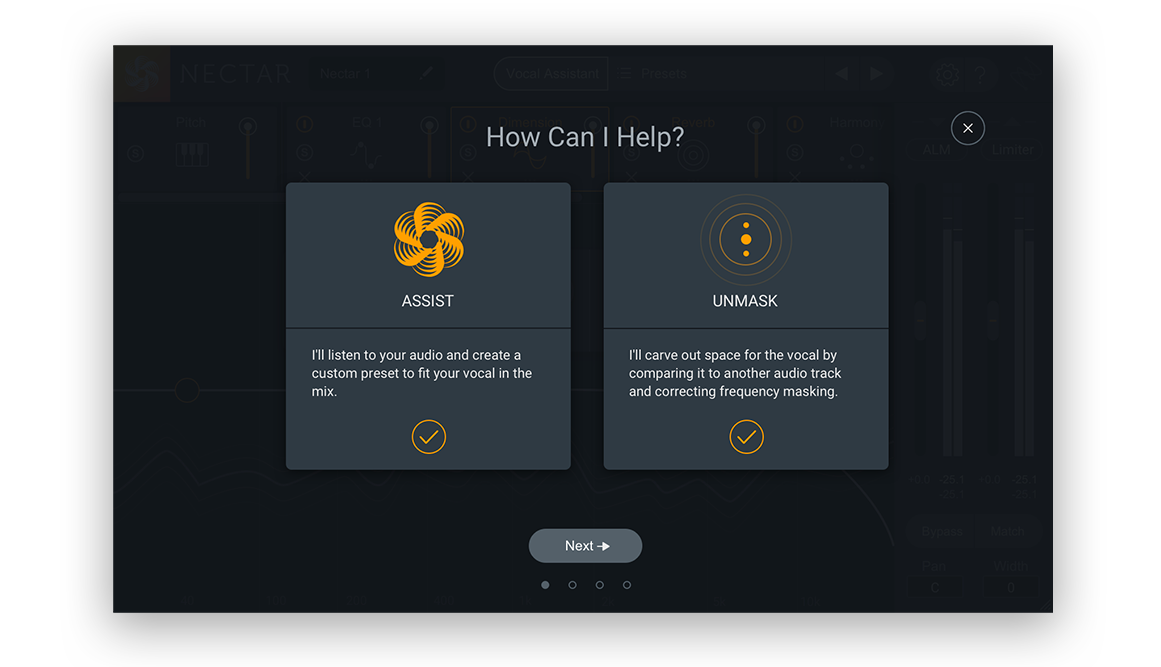 Vocal Assistant is your go-to extra pair of trusted ears. When you open up the feature, it offers you two help options: Assist and Unmask. Let’s explore each in greater detail.
Assist
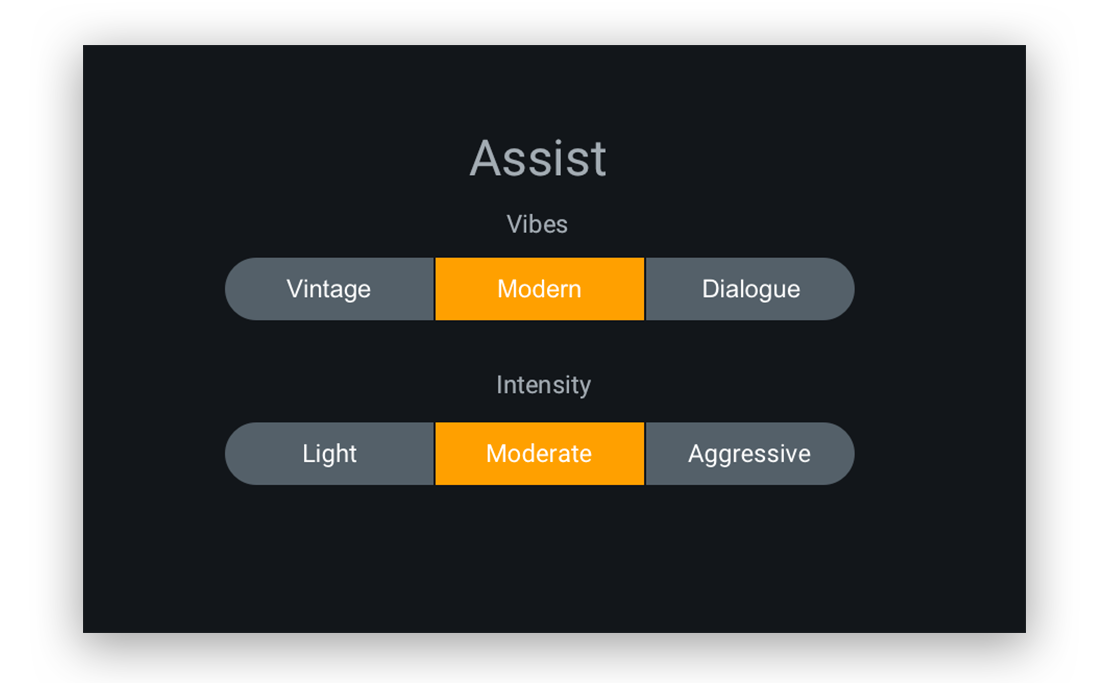
Using machine learning technology, Vocal Assistant detects and automatically adjusts level inconsistencies, timbre variations, resonant peaks, and harsh frequencies. Upon detection, Vocal Assistant addresses these issues by setting EQ nodes, removing pesky sibilants, dialing in suggested compression settings, etc. You can choose to have the aesthetic of the overall sound align with one of three different Vibes (Vintage, Modern, or Dialogue) and one of three different Intensities (Light, Moderate, or Aggressive). The Assist feature is great for quickly arriving to an optimal starting point, so that you can focus on topping off your sound with your personal touch.
 Unmask
Masking is one of the most common issues encountered in a mix. The term refers to when the perception of a sound is affected by the presence of another sound in a shared frequency range, usually causing reduced clarity and a sense of ‘mudiness.’ Vocals are often masked by other tracks in a mix. This is mainly because they tend to occupy the mids, which is competitive sonic real estate shared by common instruments such as guitars, pianos, synths, strings, etc.


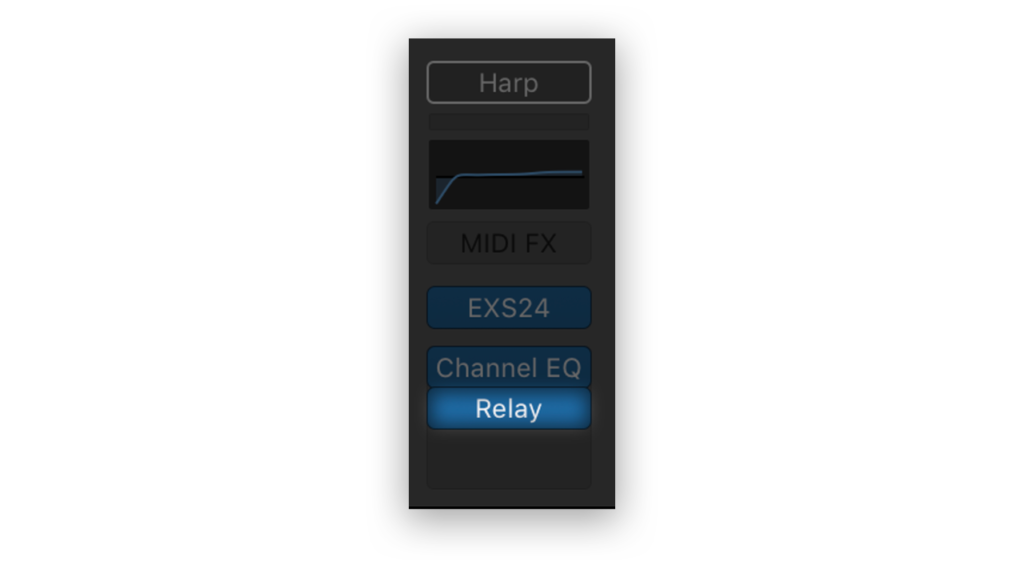
Nectar 3 brings the ability to counter the masking of any vocal with Unmask. Before we get started, it’s important to note that the feature needs to identify sources aside from your vocal track to compare for unmasking – Nectar 3 is able to detect other elements in the mix if their processing chain includes an instance of Nectar 3 or the Relay plugin. The Relay plugin is preferable if unmasking your vocals is the sole objective, since it’s much less CPU-intensive than running tons of instances of Nectar 3.
 Once you’ve attached the Relay plugin or Nectar 3 to any tracks you want to unmask, go back to your vocal track and hit the Unmask option in Vocal Assistant. You’ll now be able to view all the other sources that you selected, right from within Nectar 3.
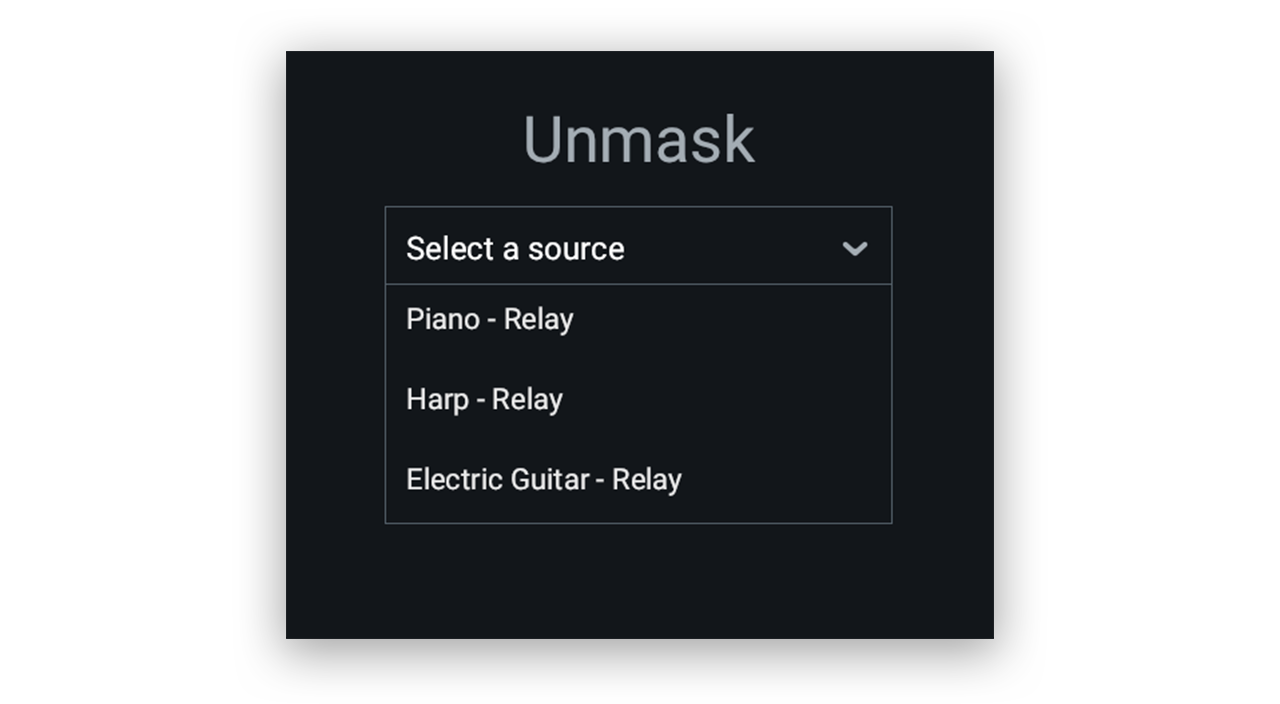 Select one of the tracks to have Unmask work its magic – if masking is detected, a static EQ will be applied to the offending source to carve out spectral space for the vocal. Relay plugins that are unmasking Nectar 3 will update their display accordingly.
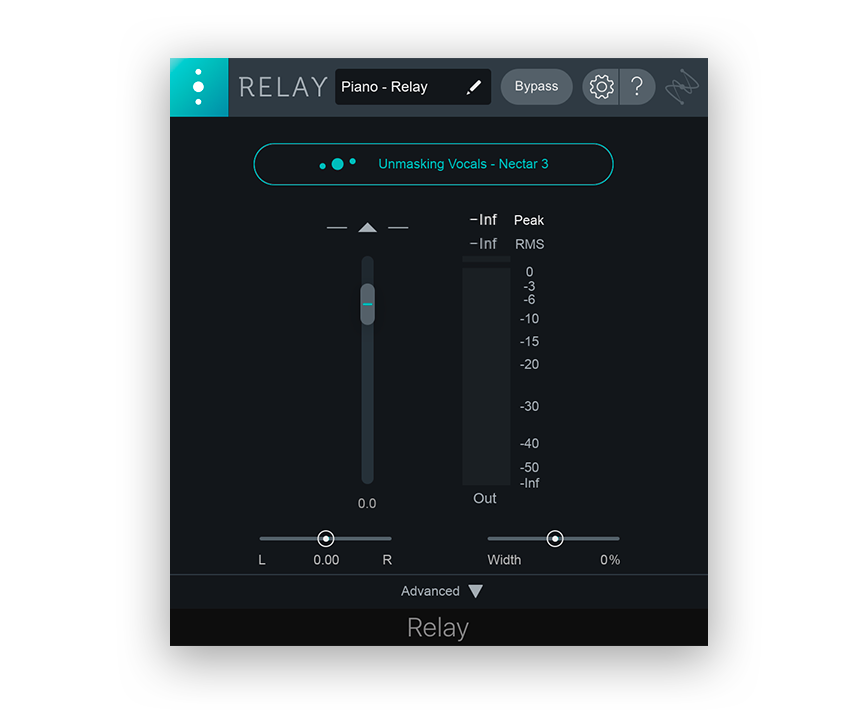 If there’s not much masking going on, the final Unmask step will display “No significant masking detected,” and no EQ will be applied to the selected source. The Relay plugin is iZotope’s latest implementation of inter-plugin communication, their innovative concept of achieving a more dynamic workflow by allowing plugins to interface with one another.
Pro Tip: On the note of inter-plugin communication, are you using iZotope’s other plugins in your workflow? Nectar 3 gives you a complete view of your entire production by sending essential vocal information to Neutron 2, directly connecting your vocals with the rest of your mix. Appearing in the Visual Mixer, Masking Meter, Tonal Balance Control, and Insight 2’s Intelligibility Meter, Nectar 3 sits alongside instances of VocalSynth 2, Insight 2, Ozone 8, and Relay to streamline the mixing process.
ИИ Nectar 3
Как и ожидалось, Nectar 3 включает технологию обучения искусственного интеллекта iZotope, на этот раз в форме Vocal Assistant. После выбора режимов Vintage, Modern или Dialogue, а также от того, хотите ли вы интенсивность Light, Moderate или Aggressive, плагин прослушивает ваш звук и выдает индивидуальный пресет, включая эквалайзер символов, балансировку уровней, сжатие, субтрактивный эквалайзер и т. Д. – коррекция посадки и высоты тона (при необходимости); и, наконец, реверберация.
Как и в случае с Neutron и Ozone, это всего лишь отправная точка, и вы, вероятно, захотите внести коррективы по своему вкусу, но результаты довольно приличные. В частности, общее управление эквалайзером персонажа и динамикой помогает поднять верхние частоты вокала эффективно и со вкусом.
Одна из проблем, с которыми мы столкнулись при использовании Neutron’s Assistant на нескольких треках, заключалась в том, что он делал все слишком ярким. Так что в некоторых отношениях это более эффективное использование AI Assistant, так как в девяти случаях из 10 вокал будет самой заметной дорожкой в миксе.
Также есть функция Unmask, которую можно запускать параллельно с функцией Assist. Для этого вам нужно разместить второй экземпляр Nectar 3 (или Neutron или Relay) на другой дорожке, которая может иметь содержимое с конфликтующими частотами. Это может быть партия фортепиано или гитары, или, возможно, целая шина, содержащая все ваши среднечастотные инструменты.
Затем два плагина будут общаться друг с другом, и если обнаружено маскирование, статическая кривая эквалайзера будет применена ко второму плагину. К сожалению, вы не можете редактировать эту кривую эквалайзера или даже контролировать величину. Кроме того, это очень простой процесс, который на удивление эффективен для обеспечения некоторого пространства вокруг вашего ведущего вокала.
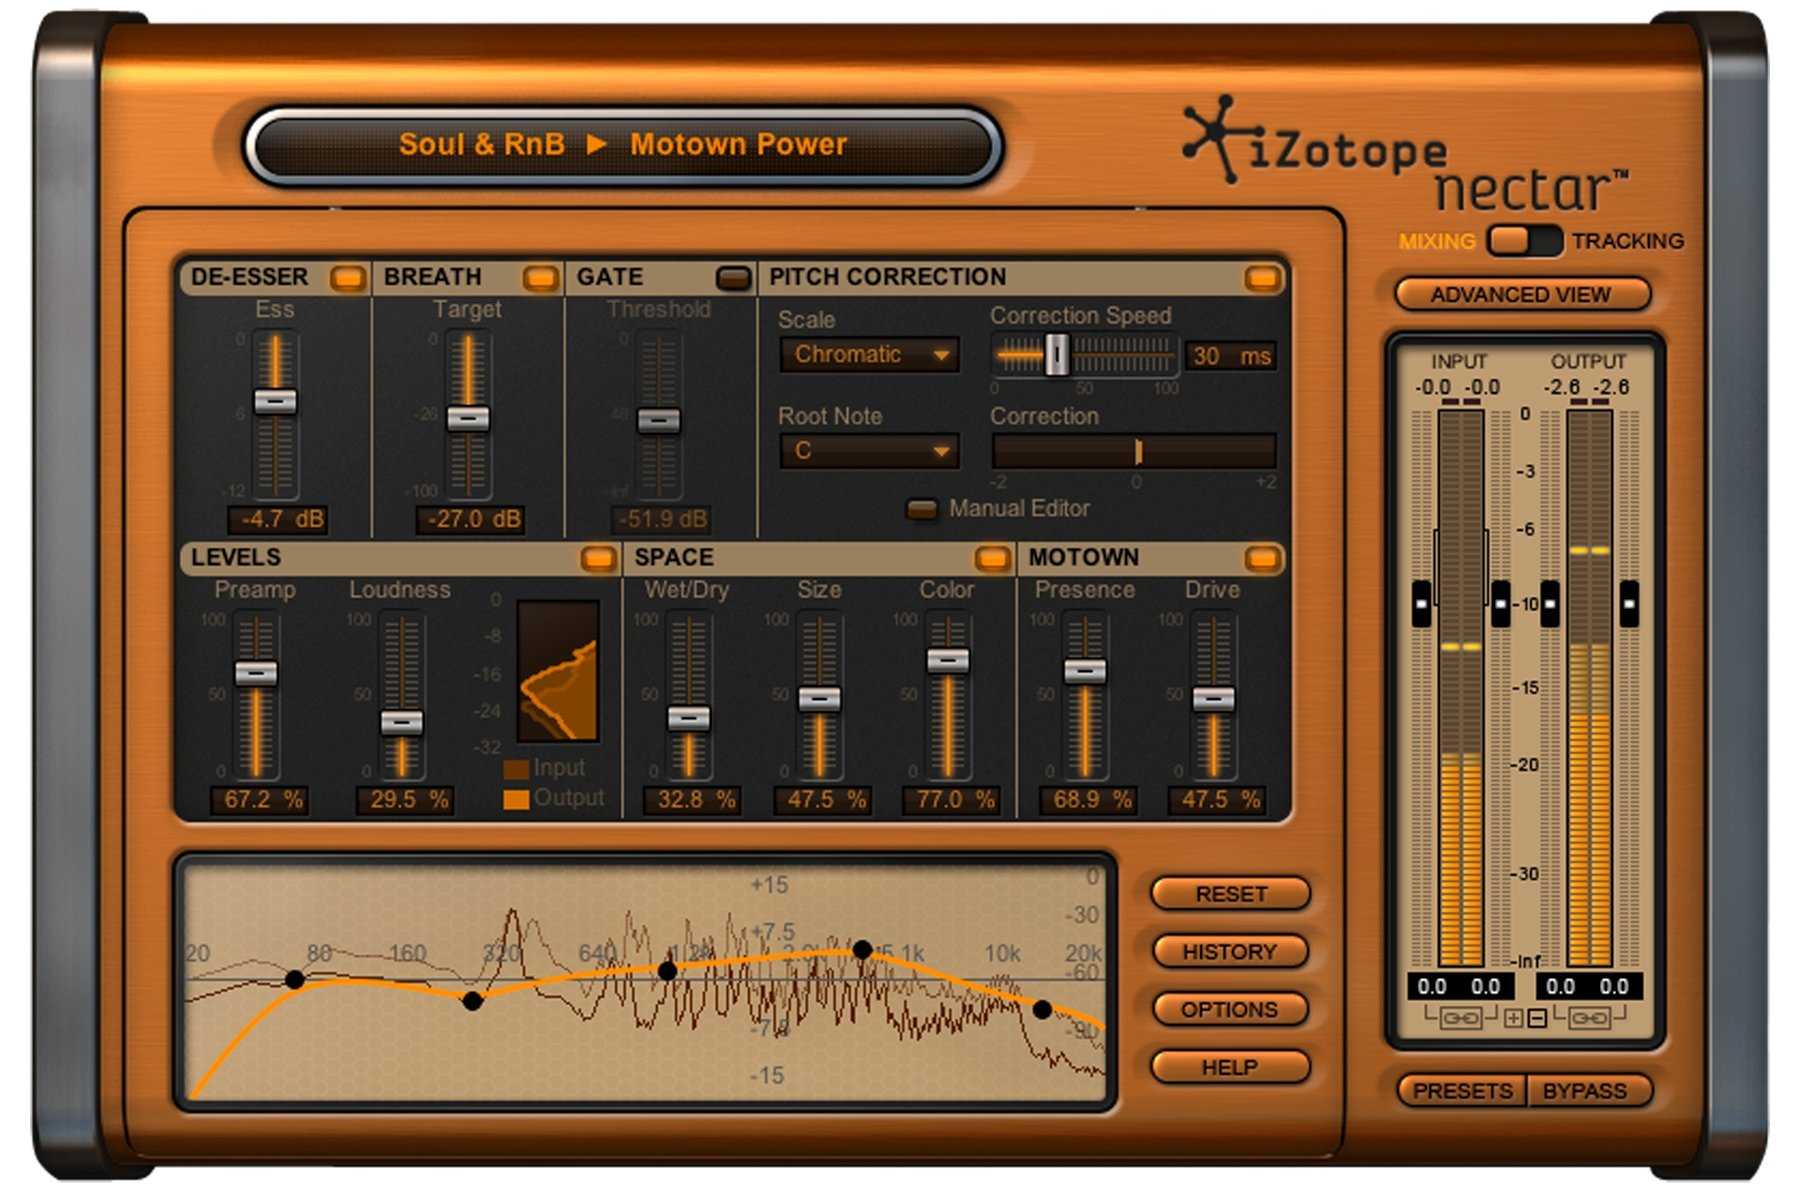
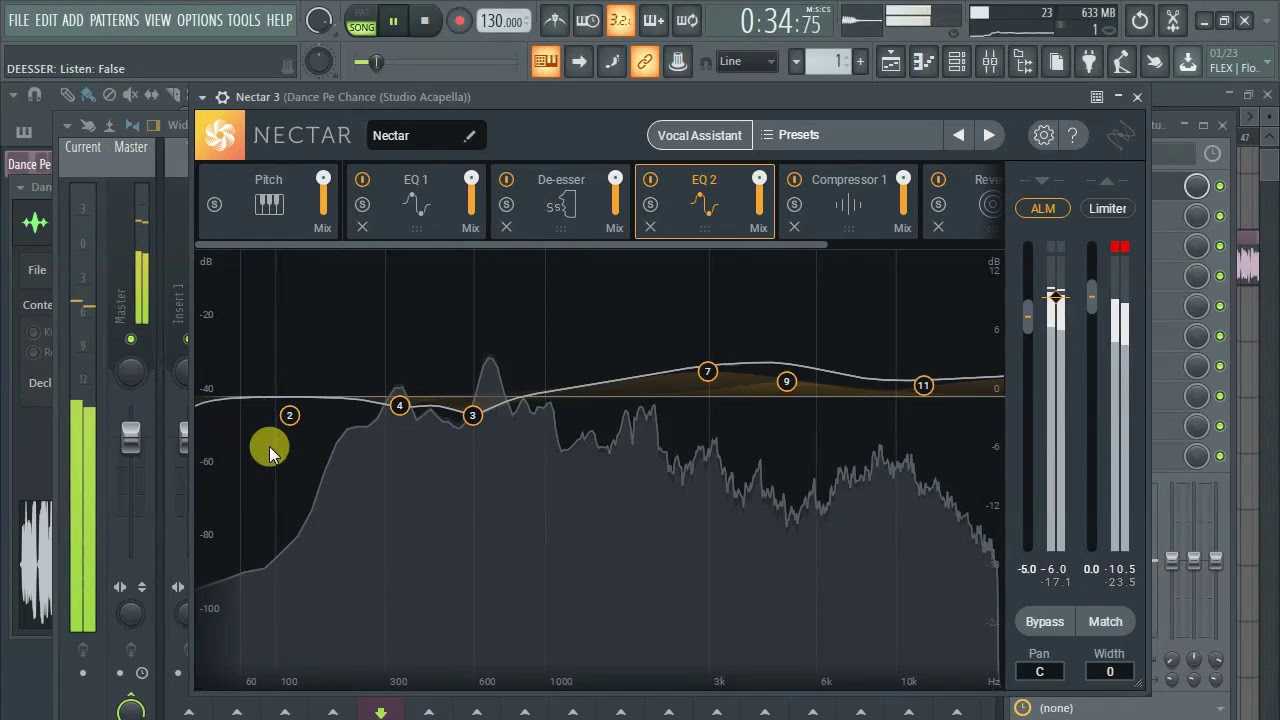
Визуально Nectar был полностью переработан, чтобы он стал рядом с другими предложениями iZotope. В графическом интерфейсе гораздо лучше используется пространство с элементами управления, наложенными на большие графики сигналов или спектра, вместо того, чтобы иметь неиспользуемые пустые блоки, как в случае с Nectar 2.
Хотя это хорошее дополнение для таких модулей, как Saturation и Delay, это полное откровение для EQ, Compressor и Gate, что значительно упрощает их использование для набора точных настроек. Шелковистое плавное движение спектра и прокрутка отображаемых форм сигналов – заметный шаг вперед в качестве даже по сравнению с недавними выпусками iZotope.
Наша единственная небольшая проблема заключается в том, что там, где Neutron и Ozone предлагают возможность точной настройки измерения, настройки Nectar практически отсутствуют. Это не является серьезной проблемой, но может быть полезно установить время спектра на бесконечность, чтобы вы могли тщательно отточить определенные частоты, а здесь это невозможно.
Overview

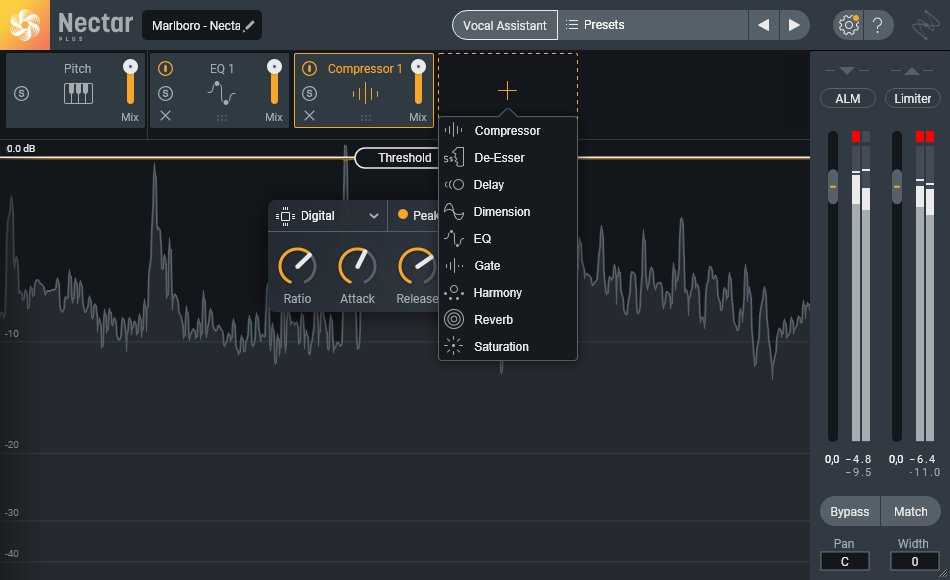
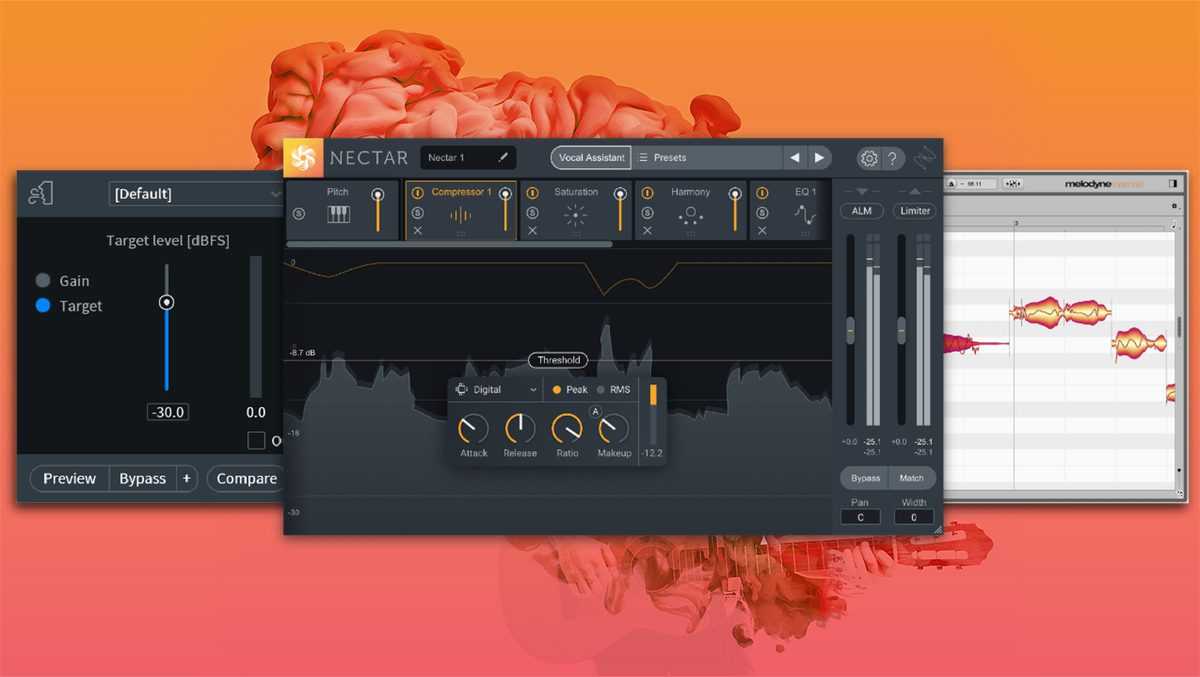
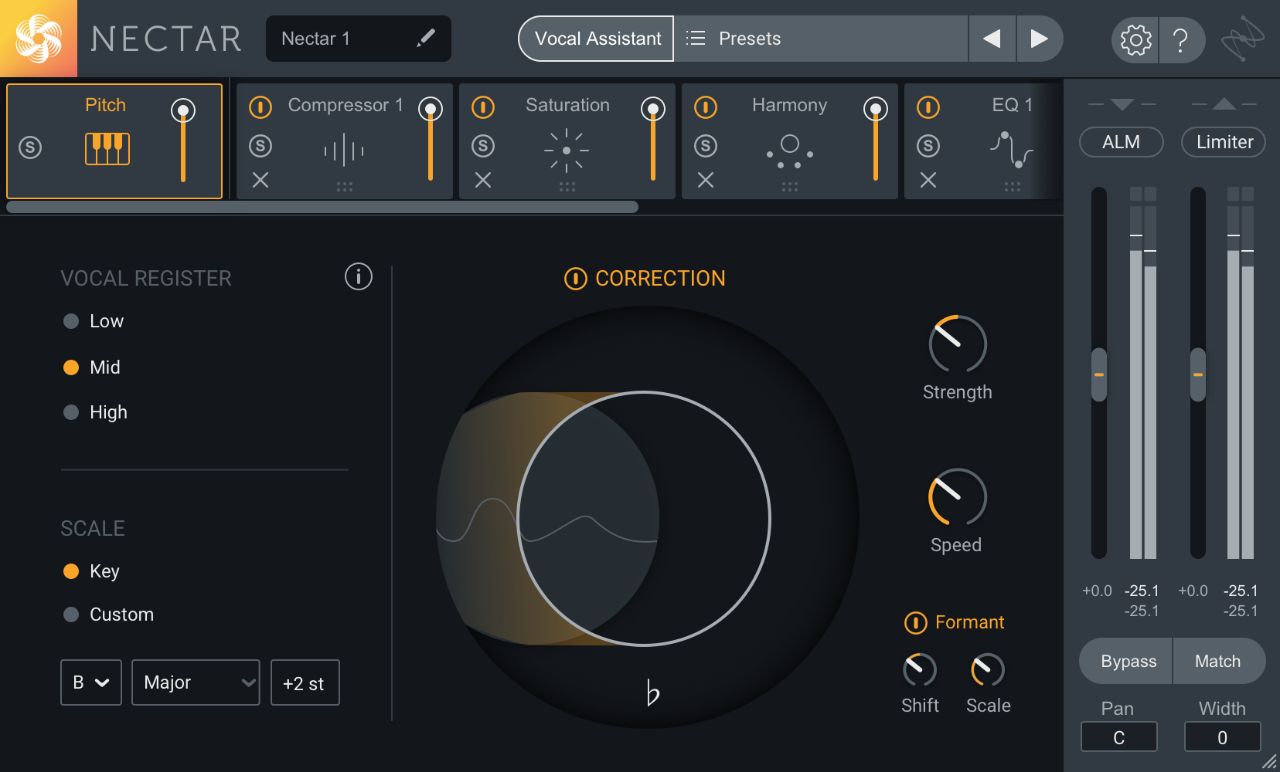
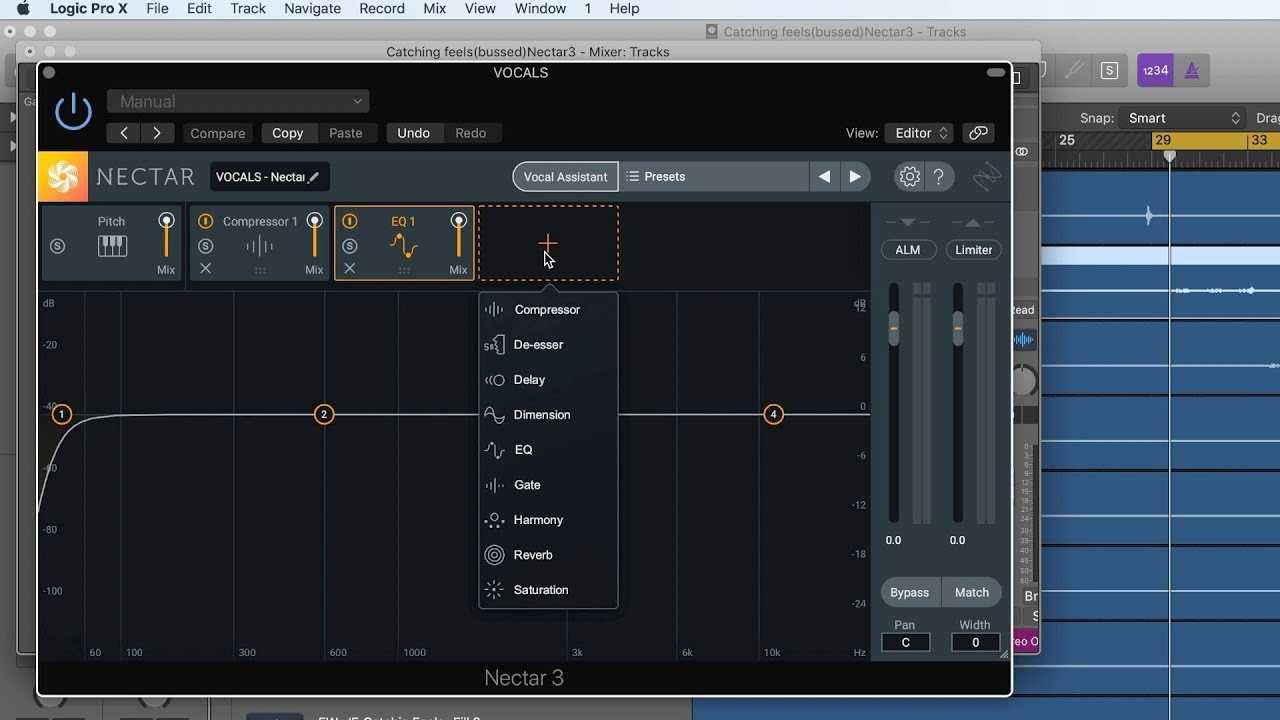
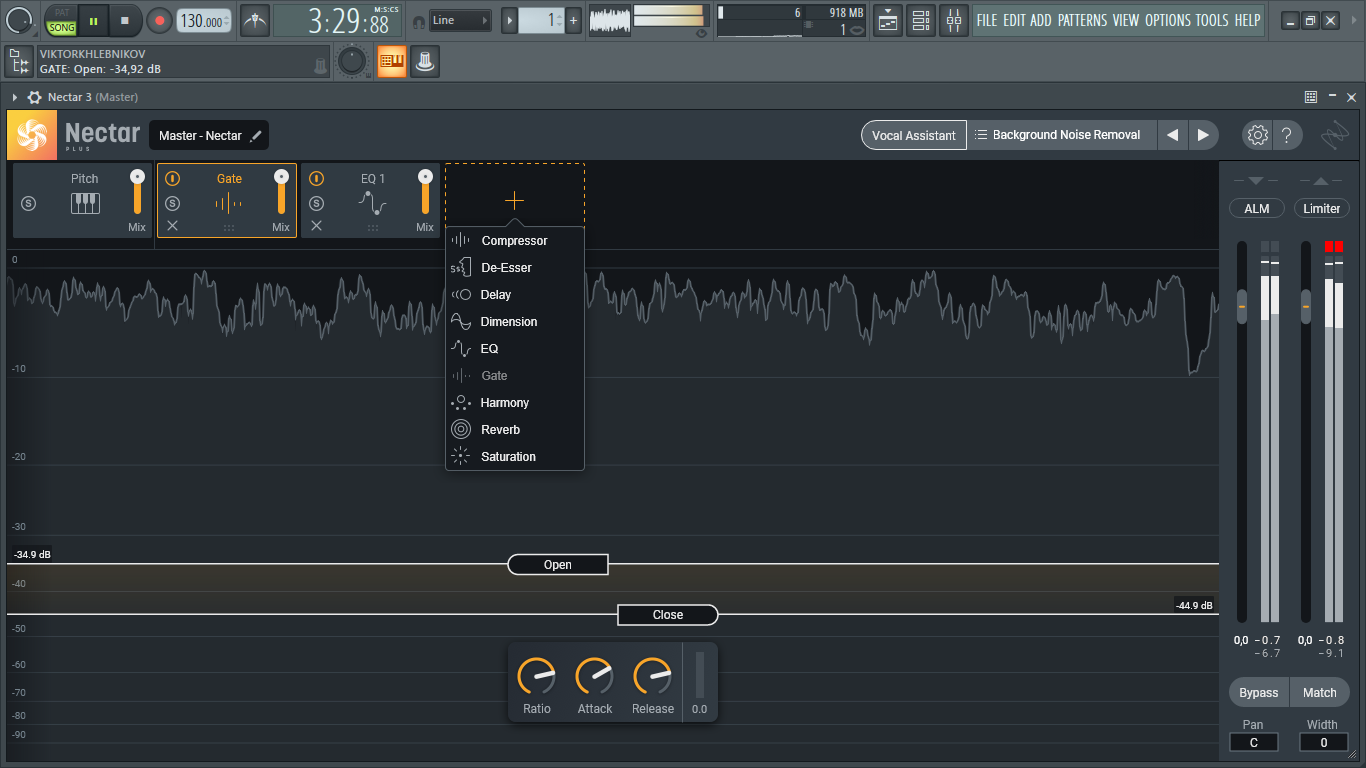
When you first open an instance of Nectar 3, you’ll be greeted by this default setting consisting of three modules – Pitch, EQ 1, and Compressor 1. This preset offers a very basic starting point, with a high pass at 40 Hz and subtle compression. Each module is situated in a horizontal processing chain across the top of the GUI, and their order can be freely rearranged. Aside from these three, an array of other modules can be added to your chain that are all well-suited for processing vocals: Delay, De-essing, Dimension, Gate, Harmony, Reverb, and Saturation are some additional options available for further sculpting your sound. Click on any module to open up its unique GUI in the main window.
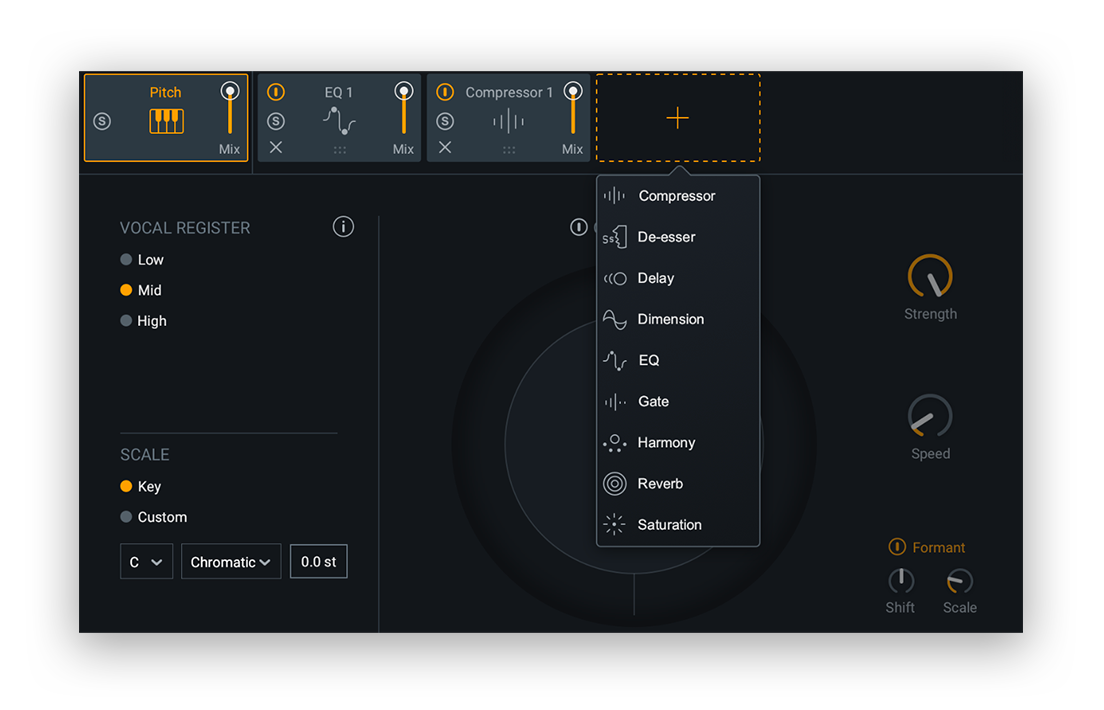 With all of these different modules at your disposal, you might be unsure where to start. Nectar 3 offers a collection of polished presets, spanning the utilitarian (Background Noise Removal, Increase Vocal Clarity) to the outlandish (Robo Army, Elephants But On Mars). Another option is to use Vocal Assistant to intelligently produce an optimized starting point for your specific vocal track.
iZotope Ozone 9 Advanced особенности:
- Всесторонний пакет программного обеспечения для мастеринга с 16 модулями
- Master Rebalance корректирует уровни отдельных инструментов в стереофайле
- Low End Focus регулирует контраст и четкость низких частот
- Tonal Balance Control анализирует и оптимизирует ваш мастер
- Полная интеграция с другими плагинами iZotope Ozone Advanced 9 через Relay
- Master Assistant использует звуковой профиль вашего аудио, чтобы привести вас к логической отправной точке
- Выберите из современной или винтажной атмосферы с целями громкости для CD и потоковой передачи
- Улучшенный эквалайзер Match EQ с улучшенным заданным рабочим процессом, подбором эталонных треков и многим другим
- Винтажные модули для добавления тепла, зернистости и атмосферы
- Модуль Imager включает в себя мощные многополосные элементы управления и улучшенный режим Stereoize
- Работает как отдельный плагин, как отдельные компоненты плагинов или автономный
- Современный, изменяемый размер интерфейса
Colour Factory

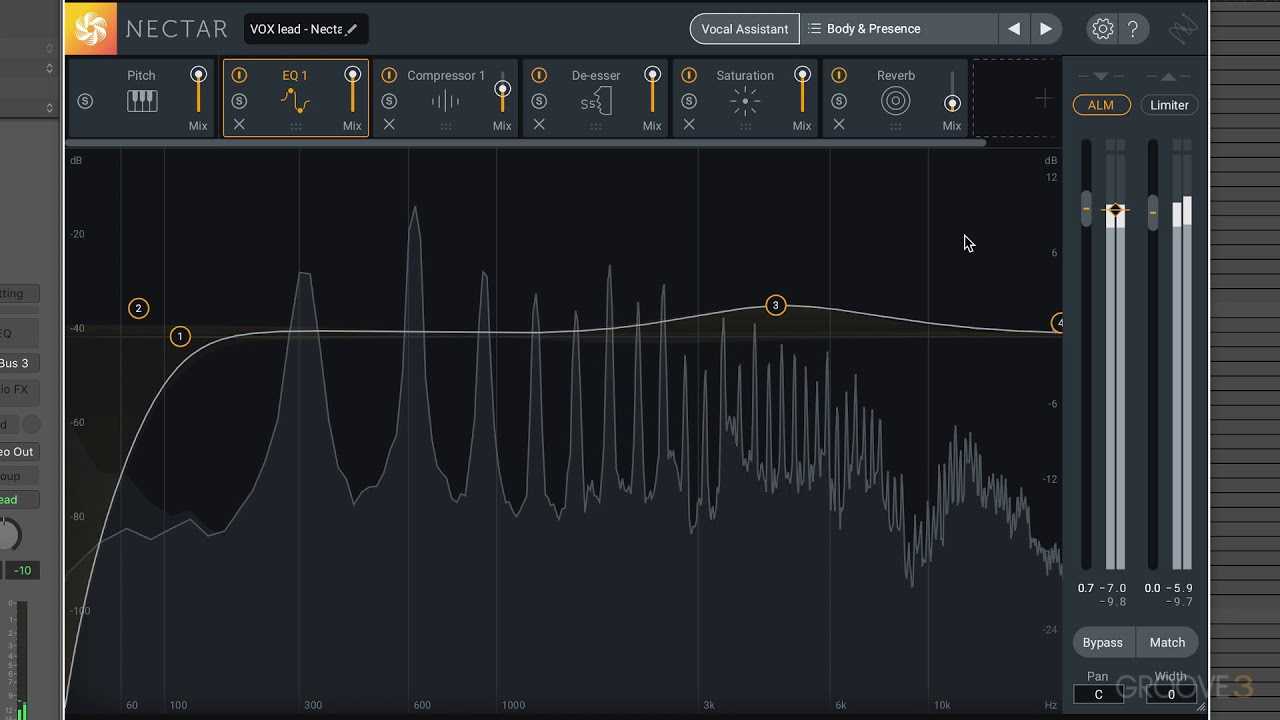
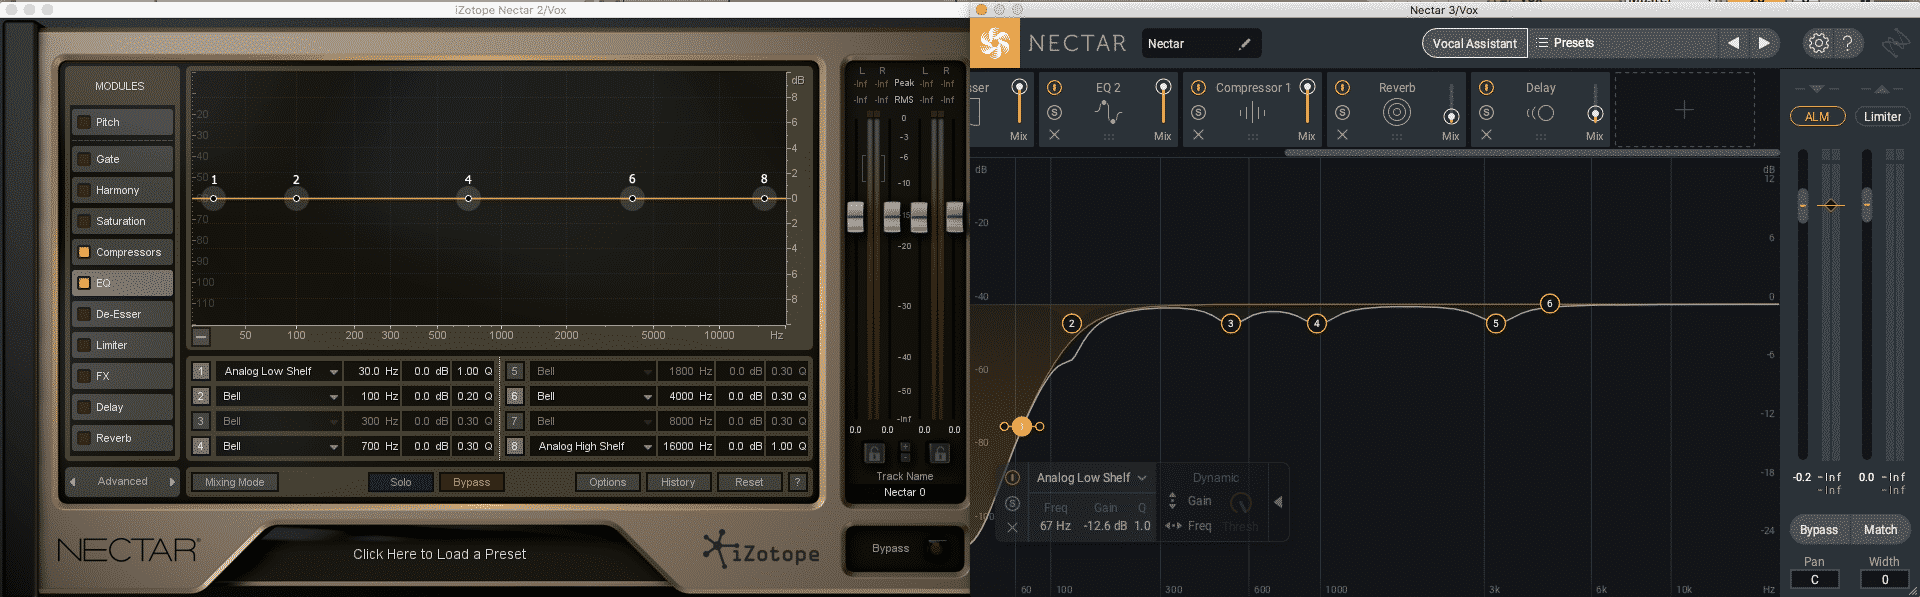
One tool you nearly always need when working on vocals is EQ. The EQ section here is based on Izotope’s existing parametric equaliser algorithms, and includes a display of the resulting EQ curve where nodes along the curve allow for ‘grab and drag’ adjustment, including bandwidth, of five EQ frequencies. Advanced mode seems to show the same display but on a larger scale, and in both views there’s a spectrum analyser.
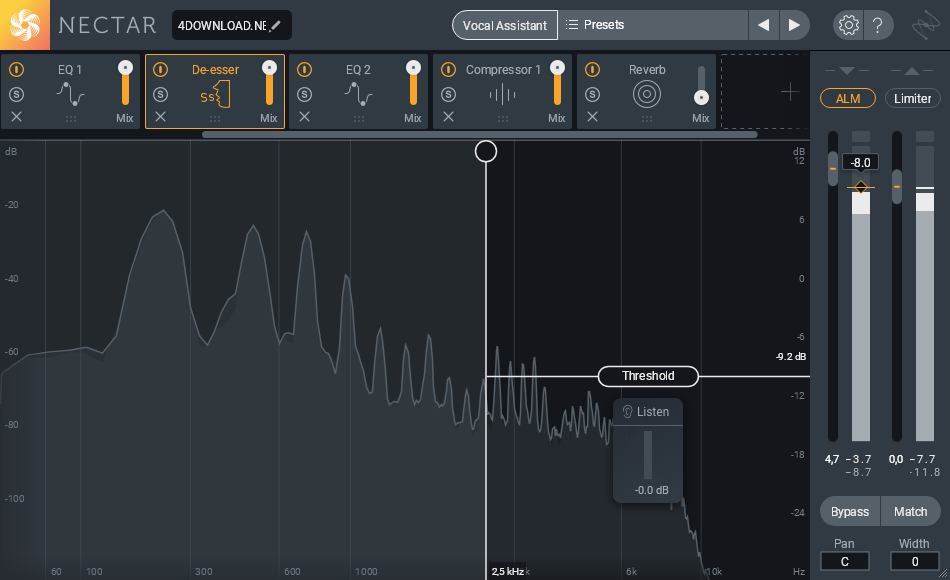
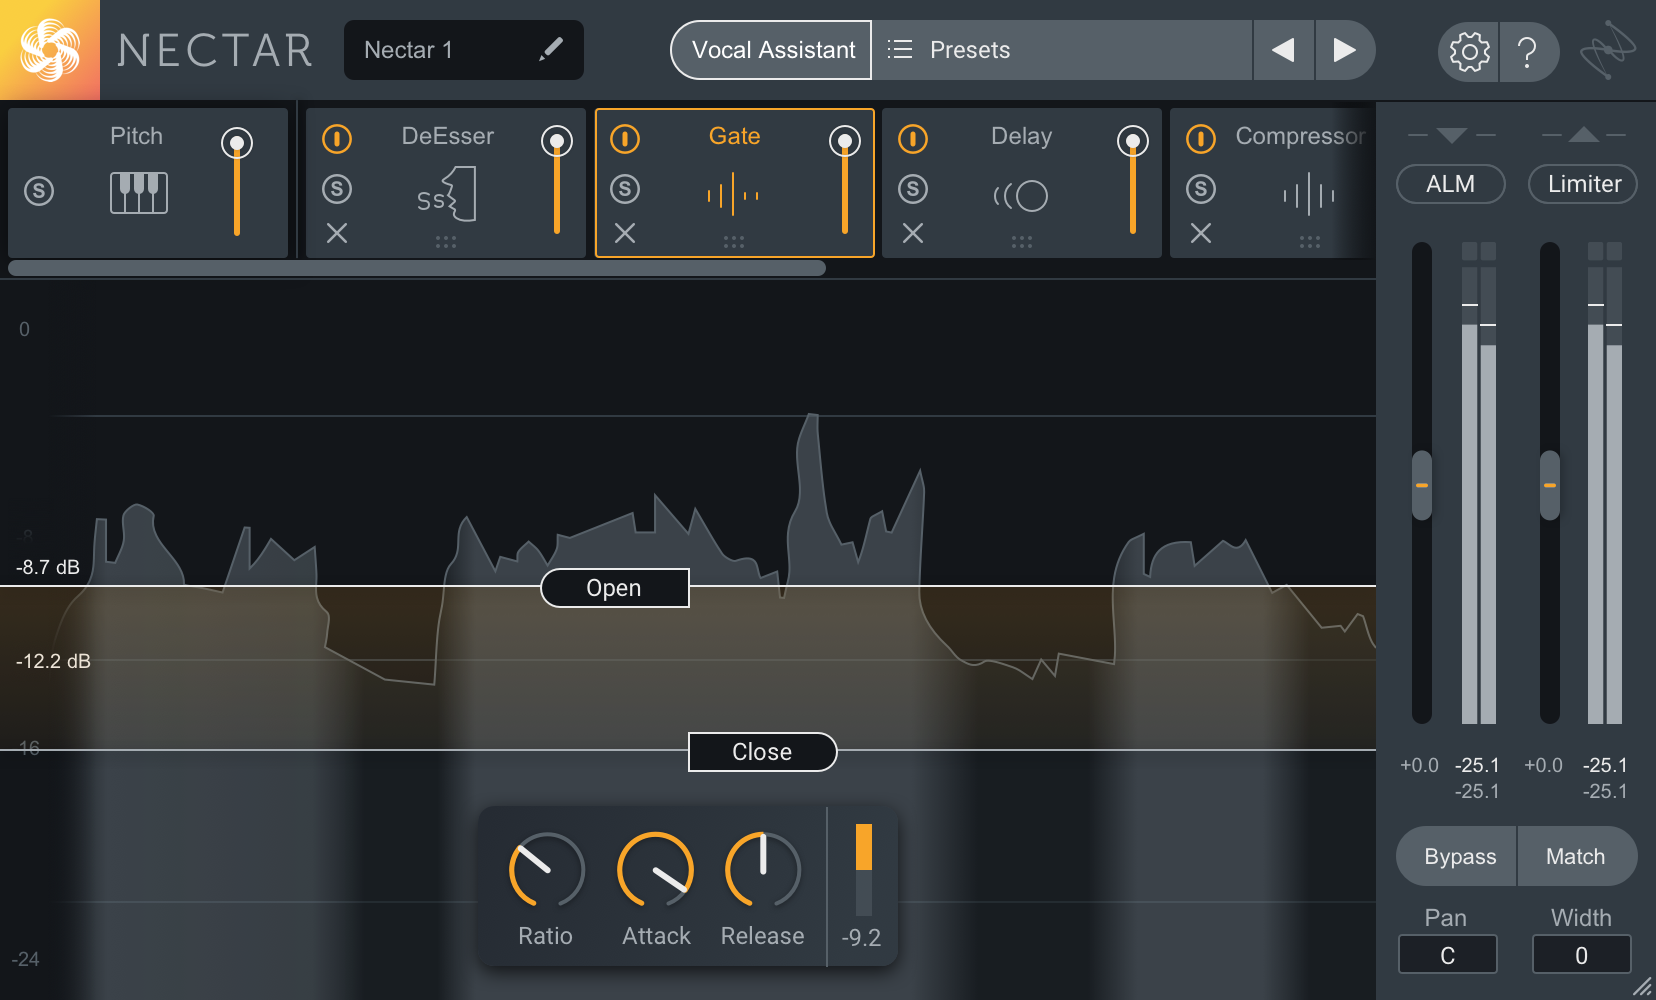
Gating is also a processing essential, as it is often required to remove spill or noise between words or phrases. The simple mode uses RMS detection, which is best suited to vocals, and automatic gain setting. Flipping to the advanced view provides manual threshold, ratio and gain controls, as well as adjustment of attack and release times and the ability to switch from RMS to peak level detection. The inclusion of a ratio control suggests that though this section is described as a gate, it is really an expander, which should make it more forgiving in operation.
Again based on iZotope’s existing limiter technology, the limiter prevents clipping on peaks and also generates a level histogram display, so you can see how often the limit ceiling has been reached. Even in advanced mode, there are only two sliders: one to set the threshold and the other to adjust the margin or remaining headroom over a range of zero to 5dB.
Delay is an effect that is widely used on vocals in many genres. The advanced view of the delay section included in Nectar allows switching between Digital, Tape and Analog characters, while the delay itself can be subjected to both modulation and controlled distortion, as well as all the usual controls for delay time, feedback and high/low‑cut filtering. Delay times can be sync’ed to the host tempo.
Going hand‑in‑hand with the delay is, of course, reverb. Nectar’s reverbs have been optimised for vocal use, and all you need do is adjust the reverb level, Color (brightness) and size. There’s also a nice graphic display of the reverb shape on the advanced page, where you can choose from seven basic reverb types, from plate to cathedral, and adjust all the key parameters using seven faders. These include pre‑delay, damping, decay time, various tonality controls and wet/dry mix.
Sweet Thing
I din’t know quite what to expect from Nectar, but it proved itself capable of delivering extremely polished results, even when I simply used its presets. On occasion, I felt there was too much compression or too much preamp distortion, but such issues can be resolved very quickly using the simplified ‘producer’ faders on the main page. Advanced mode is useful where you need to adjust the thresholds for limiters, compressors, gates and so on, but even then the number of controls has been kept to a manageable minimum, so less confident users shouldn’t be afraid to venture inside from time to time.
The presets cover a lot of ground and, indeed, you ideally need to use them as a starting point, because they determine what combination of effects and processing will be viewable on the main screen, even though you can activate or deactivate any of the other sections via the advanced pages. I think the idea of making the processes ‘producer friendly’ is a good one, and I applaud the dual‑level approach, where the user can opt to simply tweak the ‘producer’ controls or dig a little deeper to adjust the more advanced ‘engineer’ controls. Nectar really does provide all the tools you need to sweeten a vocal track, and its individual sections may also come in useful for treating other sound sources, so experimentation is the key to finding how far you can go. I’m not entirely convinced by some of the presets based on pitch‑shifting or heavy distortion, but as an all‑in‑one approach to vocal processing it’s hard to fault, and can be used on many levels, covering pretty much any vocal style.


Waves’ Artist Series plug‑in suites take a similar approach, in reducing the number of user controls, and include plug‑ins tailored for vocals, but they don’t offer ‘under the hood’ access to the more advanced settings, as Nectar does.
Pros
- All the vocal processing tools you’re likely to need, in one plug‑in.
- Easy to use, but can be adjusted in more depth if required, using advanced mode.
Cons
The only limitation is that the preset used as a starting point determines which processing sections are visible on the main screen. However, in the advanced view you can switch on and adjust whichever processing sections you like.
Harmony
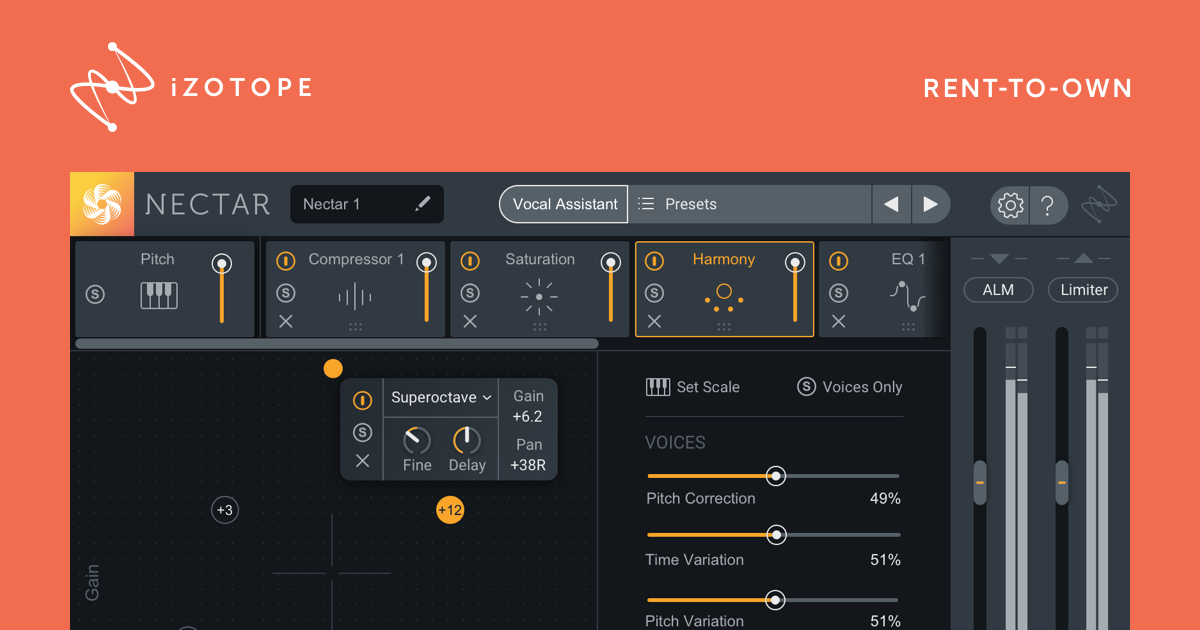
 While features such as Vocal Assistant and Dynamic EQs are great for making corrective improvements, the Harmony module offers great opportunities for adding a creative touch to your vocals. The grid-like area of the module, referred to as the Voice XY Pad Controller, offers a sleek and intuitive way to generate vocal harmonies.
Simply click anywhere on the grid to add a new voice, and designate your desired interval via the drop-down menu. You can set a custom key for the harmony to follow by hitting the Set Scale button, which will redirect you to the Pitch module. The vertical positioning of a node on the pad controller determines the harmony’s volume, while its horizontal position determines its location in the stereo image – this allows for an intuitive and swift workflow for creating vocal harmonies. While larger intervals will inevitably result in artifacts, they will often be surprisingly unnoticeable when the voices are tucked nicely behind the lead vocal.
Pro Tip: Want more precise control over the harmonies? Trigger voices using a MIDI controller by activating the MIDI mode feature, located on the bottom right of the GUI.
This concludes our introductory tour of Nectar 3. It goes without saying that there are plenty of other modules to explore, but hopefully this guide gives you a glimpse into some of the new and best features this latest installment of Nectar brings to the table. If you have a question, don’t hesitate to leave it in the comments below.
November 1, 2018
Harrison Shimazu
Harrison Shimazu is a music composer, content strategist, and writer who’s passionate about democratizing music creation and education. He leads the Splice blog.
Conclusion
iZotope’s Nectar 3 is a powerhouse of a plugin. If you’re looking for a one-stop shop for modern vocal processing look no further. You get ten effects modules (and can add up to twelve total), one of which is a crisp autotune, and the coveted Assistant technology found in other Izotope plugins.
From any other company, Nectar 3 would only be a great vocal multi-effects rack. What makes this plugin different from everything else on the market is the Vocal Assistant feature and its control over the already powerful effects in the plugin. One click and the plugin will assess your vocal track and create an effects-chain it deems appropriate.
You have the ability to create a custom preset or connect the plugin to another track via the companion plugins Relay. Utilizing Relay you can ‘carve out space’ for your vocals with a single click. This sort of ease is worth the price of admission. That plus the inclusion of RX7 Breath Control, and Melodyne Essential 4 for pitch editing makes Nectar 3 one of the best options on the market.
You can get your copy of Nectar 3 from iZotope on sale for $199 now (reg. $249). If you own any Izotope plugin you can use your loyalty discount to purchase the plugin as well.
Are you a music producer? Do you want to improve your skills and become part of a growing community of super producers? Check out our classes, new semester starting January!
My Favorite things about Nectar 3
1. All in one Package
It includes every type of processing I need to shape and polish vocal recordings. And it does so in individual modules that you can move around as you wish in the signal chain.
These modules are: EQ, breath control, delay, dimension, harmony, compressor, pitch correction, reverb, de-esser, gate and saturation.
2. Many Modes per Module
Basically all modules have many different modes and features you can change. The saturation module has 8 different distortion types to choose from. The compressor has 4 types to choose from, and so on.
This means that you can easily change the color and tone of basically all aspects of the Nectar 3 signal chain. Just be careful to not waste time trying and testing a lot, as I know the danger of having too much fun with trying variations of every single module, haha.
3. The Presets & Assistant FeatureYou get a lot of presets to start from, in various categories and named to give you an idea of the end result. What I also liked, is that you get access to the Nectar 2 legacy presets which are categorized by music style.
But you also get the amazing assistant feature that basically analyses the audio waveform and then makes a lot of automatic changes that it suggests. This will often give you a great starting point.
4. The User InterfaceI love plugins that give me control over the scaling of the interface, since I use a high resolution monitor that is also fairly far from my eyes due to my specific studio setup.
I also like the modular approach which not only gives me control over the signal chain, but also improves the clarity by focusing the interface on one module at time that I select.
5. The Online ManualI don’t think I have ever praised a plugin or tool for its manual. But iZotope really did a supreme job with theirs. You can simply click on the little question mark in the user interface, and instantly open their online manual in a browser. Not only is it super well structured for each feature, but I have to say that the layout and descriptions of every single feature is so clear and easy to understand.


Basically, while most manuals are as boring to read as watching paint dry….this online manual for Nectar 3 has actually been a pleasure to use for reference while learning all the features of this plugin
The amber nectar
As expected, Nectar 3 includes iZotope’s AI learning technology, this time in the form of Vocal Assistant. After selecting from Vintage, Modern or Dialogue modes, and whether you want Light, Moderate or Aggressive intensity, the plug-in listens to your audio and spits out a custom-made preset including character EQ, level balancing, compression, subtractive EQ, de-essing and pitch correction (if required); and finally reverb.
As with Neutron and Ozone, this is just a starting point, and you’ll want to make adjustments to taste, but the results are pretty decent. In particular, the overall Character EQ and Dynamics control helps lift the top end of the vocal in an effective and tasteful manner.
One of the issues we had when using Neutron’s Assistant on multiple tracks was that it made everything too bright. So in some respects, this is a better use of the AI Assistant, as nine times out of 10, the vocal will want to be the most prominent track in the mix.
But wait! The Assistant isn’t finished… There’s also an Unmask feature that can be run in parallel to the Assist function. For this, you’ll need to place a second instance of Nectar 3 (or of Neutron or Relay) on another track that may have clashing frequency content. This could be a piano or guitar part, or perhaps a whole buss that contains all of your midrange instruments.

The two plug-ins will then talk to each other and if masking is detected, a static EQ curve will be applied to the second plug-in. Unfortunately, you can’t edit this EQ curve, though, or even control the amount. That aside, it’s a very simple process and surprisingly effective at providing some space around your lead vocal.
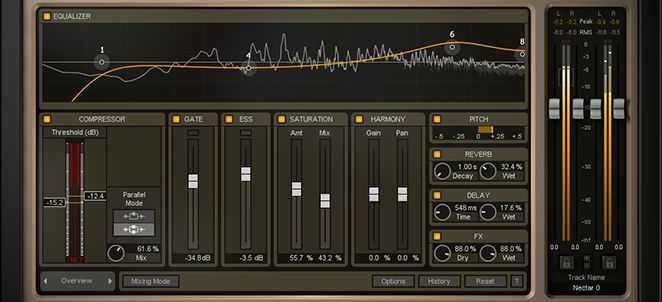
Visually, Nectar has had a complete overhaul to help it sit alongside iZotope’s other offerings. The GUI makes much better use of space, with controls overlaid on the large waveform or spectrum graphs, rather than having unused, empty blocks, as was the case with Nectar 2.
While this is a nice addition for modules like the Saturation and Delay, it’s a complete revelation for the EQ, Compressor and Gate, making them much easier to use for dialling in precise settings. The silky smooth movement of the spectrum and scrolling waveform displays is a noticeable step up in quality, even from iZotope’s recent releases.
Our only minor gripe is that where Neutron and Ozone offer the ability to fine-tune the metering, Nectar’s settings are almost non-existent. This isn’t a major issue, but it can be useful to set the spectrum time to Infinite so that you can carefully hone in on certain frequencies, and that isn’t possible here.


